
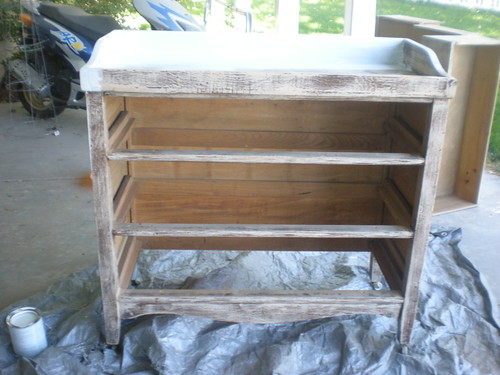
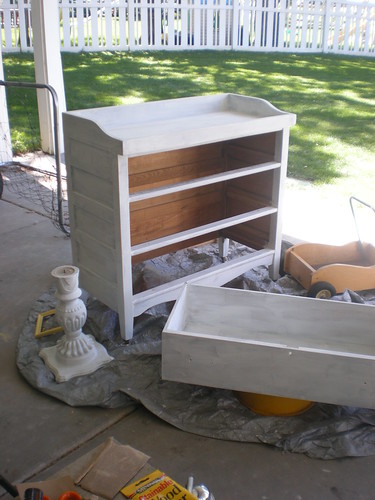
I used Zinsser oil-base primer (and found out due to EPA regulations that by the end of the year you will no longer be able to buy oil-based primer OR paint.... at least not at hardware stores) and let the primer dry over a weekend.
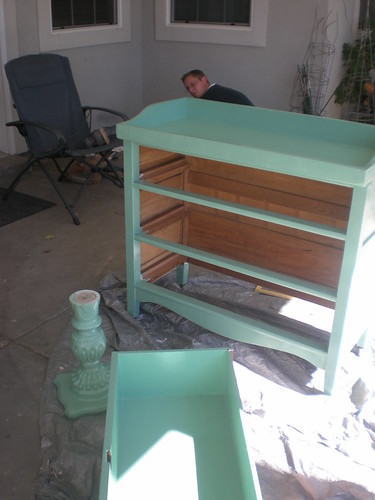
Then we tackled painting. This job took 3 coats of Martha Stewart's "Duck's Egg" mixed in one of the last cans of oil-based paint they had in the store. While working on the dresser, I also primed and painted the plaster base of the side table. (I think it was originally intended to be garden furniture. It has a plaster base and a faux-marble cement top)
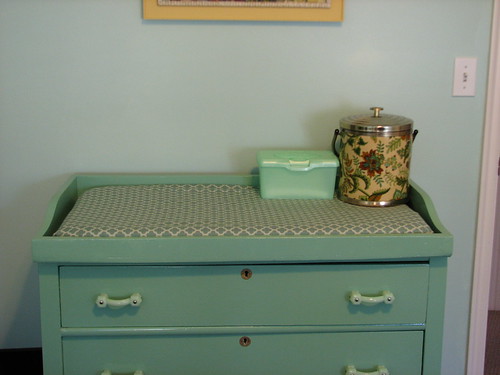
I covered the dresser with 2 coats of Jenny Komenda's favorite "wipe on poly", and then coated the bottom of the drawers with bar-soap and candle wax in an attempt to get them to glide smoothly.
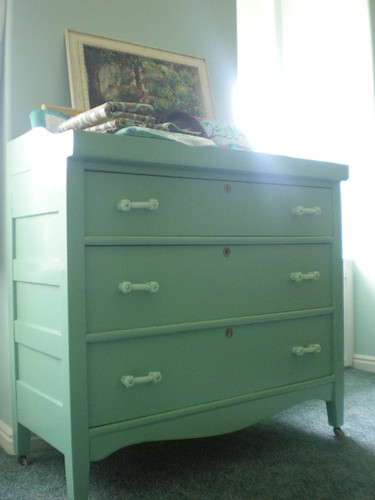
I bought new handles for the changing table. Jadeite milk-glass. I am thrilled with them, and Mr Renn hates them. This is how my relationship with pressed glass tends to mesh with my marriage, every.single.time.
The changing table had come with a changing pad, but it wasn't a standard size, so I had to sew my own changing pad covers. I used some more Joel Dewberry fabric that coordinated. (I found that cool ice-bucket on etsy. It holds lotion and diaper-rash cream and milicon and such)
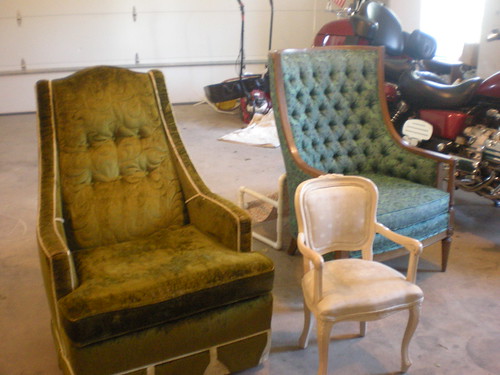
Here you can see how the side-table turned out, and can also see the Large chair and footstool (more on those below)

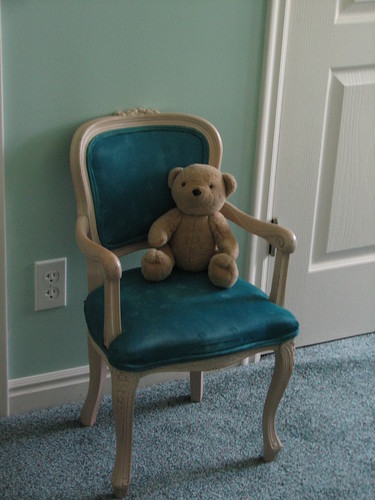
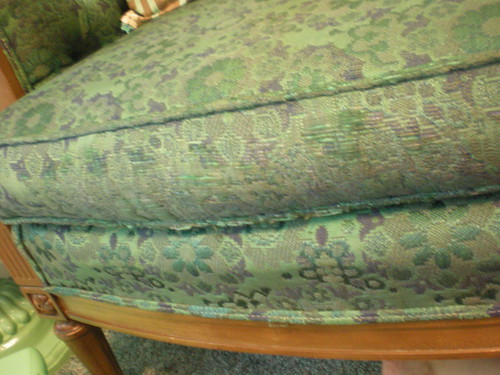
The children's Louis XIV chair I was thrilled to spot at Saver's for under $5. The upholstery was filthy, and some kid had attacked the arms with an orange highlighter.
Someday I want to reupholster and paint it, but that was SO not in the budget for now. Instead I had it (and the other chairs) cleaned when my parents were having their carpets cleaned, and decided to try dying the existing fabric.
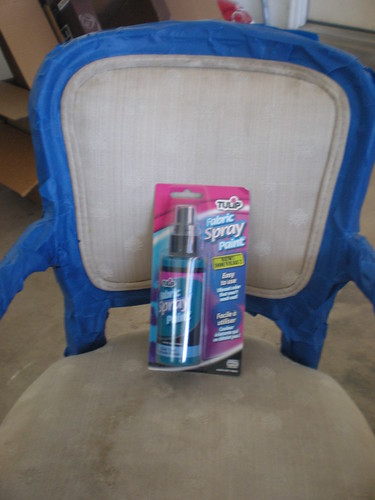
This fabric spray paint was about $6 at Michaels. I ended up needing to use 2 bottles, but only because we had the brilliant idea to rinse it with a power-washer the first time. The coverage is still not perfect, and by no stretch of the imagination looks professional, but it works for now (until I am in a position to reupholster the chair).

The most time consuming part was taping off all of the wood (which proved to be unnecessary, since the dye that still managed to get on the wood wiped or flaked right off).
The large green chair is the perfect color for this room, but it's not staying in this room. After we move I'm taking it with us, and my mom's wood rocking chair will take it's place. This chair will also most likely be reupholstered someday, but in the meantime it had some threadbare spots. For a quick and very short-term fix I tackled those with a matching sharpie. Oh yes, I am a high roller.(But it worked, it looks a lot better)
Before:

After:
I spent weeks trying to find a footstool to use with this chair (because nursing is always easier with elevated feet) but couldn't find anything in my price range. Then while I was sewing in the basement I stumbled upon a box containing the pieces of an old vanity bench. One of the legs had split down the center and been declared un-repairable (even if they glued it, it could never bear weight). But my mom had had a hard time parting with it, so in the basement it sat (for years!) waiting for me. I ordered 4 pine sofa legs off of ebay. (I actually ordered them before finding the bench - serendipitous story) and had Mr Renn construct a new base substituting the 6 inch sofa legs for the 24 inch vanity bench legs.
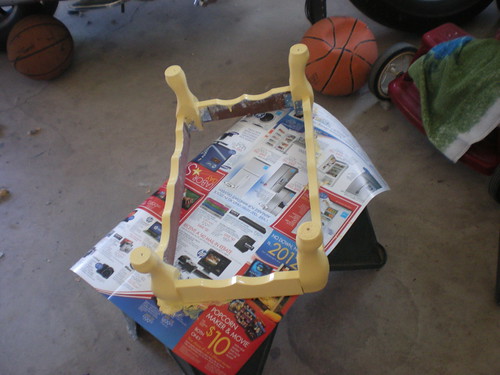
Then we sanded, primed, painted, polyeurethaned, and reupholstered the top. I used a $3 tester of Martha Stewart's "Cornbread" for this and all other yellow painted-nurseryness. Voila - one footstool!

10 comments:
I love love love it all!!! Now it just needs a baby to make it perfect
This is amazing!! I am so impressed! I would have never, ever thought of doing any of these things, but now I feel inspired to try to be more creative (when I have a place I can actually decorate...our place is way too small). Great job on all of this, the whole room looks great!
Way to go on the room! Now you've inspired me to tackle some of my own projects.
Question about the painting - did you use a roller or brush?
Where on earth do you find the time? I love doing these kind of projects... I did a full room mural in what was the toy room form #1 and is now the nursery for #2. I have created a headboard and platform bed and designed and built a fireplace mantle... but it has taken me 3 years and I have TONS of projects left to do!
@K-Krew: I used both (on the dresser) a mini foam roller and an angled brush. It's worth it to buy the most expensive brushes, they make a world of difference! And if you use latex instead of oil based you don't even need to buy anything special to clean your brushes with - just make sure to clean them before they dry!
@ Chelsea: this is called taking advantage of my one burst of nesting energy while pregnant. Now that it is spent I will probably not be tackling projects until after we move again.
Beautiful! I love the whole room; the color, the fabric, the furniture; the whole thing! So fun!
First of all, what a wonderful idea to have a beautiful room you can enjoy now with your sweet new baby and then still have for years to come. I love that the crib was used for all your Mothers children and now will be used for her Grandchildren. I bet your Mom and Dad love what you created Em. It is fantastic. You have such a talent!!! The colors, fabrics, furniture, everything looks amazing. Isn't nesting the most powerful thing? You accomplished so much. It's wonderful!!!
Love it!!!!
Ellen
Wow. Are you sure you don't have any of that nesting energy to send my way? I got nothin'. Seriously beautiful, Emily. I think I may need to take the mother/child etching when you move :). You are one talented woman.
Clever, clever, clever... and gorgeous to boot!
Post a Comment